I had an old Dell Inspiron 6400 lying around at home and decided to install Linux on it – had been dabbling with Linux for many years – but as it was never the only operating system on the computer – didn’t really get ahead with it. Also the plan was to make a multimedia center that I could control with my mobile. I had been doing this on my mac using Salling Clicker, but had no idea what I would do with the Dell – so, as is usual in such cases – Google came to my help.
The feature-set I had planned includes:
- Digital Photo Frame – slideshow starts as soon as the computer boots
- Media Centre (controlled via Bluetooth mobile):
- Control wi-fi router through Bluetooth mobile
- E-book server – Serve e-books to the nook over wi-fi
- Remote access via ssh and vnc
- Sync music, videos and photos from usb HDD (to-do)
- Send commands via email – e.g start slideshow, suspend, start/ stop torrents, etc. (to-do)
- Act as a wireless server for my macbook time machine
- Display clock while in slideshow mode
The Software
There are many small linux distributions available for this purpose and the ones I liked and tested include:
- Geexbox – very small, very nice, was perfect for the job – except for the fact that it was based on Ubuntu 9 – and to my chagrin, the dell had an ATI Radeon X1100 video card – which is not compatible with Ubuntu 9 (out of the box). I have found some options that would allow me to use geexbox now, but have moved on
- XBMC – another very nice OS – but same problem as Geexbox
- Linux MCE – Could not download this as the download links are offline, but reviews on websites are extremely good
- Ubuntu 10.04 – Finally gave up on smaller distributions and installed the full version of Ubuntu, very easy installation, worked out-of-the-box and I loved it. Was using a software called Freevo to run the multimedia center – unfortunately it was crashing regularly, specially on downloaded videos. So the search continued
- Mythbuntu 10.04 – finally settled on Mythbuntu, its based on Ubuntu 10.04, has most of the multimedia software required pre-installed and has the MythTV interface for the multimedia centre
Install MythUbuntu 10.04 (Lucid Lynx)
Really easy – was a breeze – download the latest MythUbuntu live CD from the following link:
http://www.mythbuntu.org/downloads
Boot from the Live CD or USB drive and install on your hard-disk using instructions on the following pages:
http://www.mythtvbook.com/wiki/The_Easy_Way:_Installing_MythBuntu
http://www.youtube.com/watch?v=Gw1OUT70iGo
In addition for the system to support my projector, I had to set ‘nomodeset’ for the linux kernel, you may not have to so try without the following. Instructions as follows (courtesy http://techies-r-us.com.au/blog/?p=483):
sudo nano /etc/default/grub
Change
GRUB_CMDLINE_LINUX=””
to
GRUB_CMDLINE_LINUX=”nomodeset”
Then run
sudo update-grub
Restart
Install supporting packages & configure
For Mythbuntu to work as you want, you need to install additional packages (you will need an internet connection). These can be installed by running the following commands in ‘Terminal’ (courtesy http://xtremediary.blogspot.com/2010/04/to-do-after-installing-ubuntu-1004.html and http://www.my-guides.net/en/guides/linux/193-ubuntu-lucid-lynx-1004-post-installation-guide)
- Music Player:
sudo aptitude install xmms2 xmms2-plugin-all
- Some extra codecs:
sudo aptitude install ubuntu-restricted-extras
- Text Editor:
sudo aptitude install medit
- Screen Configuration:
sudo aptitude install arandr
- Sync support:
sudo aptitude install rsync
- Ebook Management:
sudo aptitude install calibre
- Media Player (optional as you would be using mythTV most of the time):
sudo aptitude install mplayer
- VNC Server (allows you to control the system from another computer):
sudo aptitude install vino
- On-Screen Clock (for slideshow):
sudo aptitude install osd_clock
Configuration:
Run Applications -> Settings -> Update Manager
Update the system – requires an internet connection
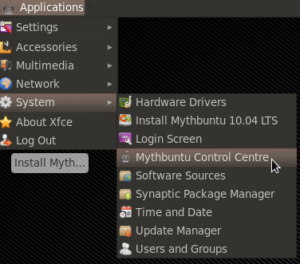
Run Applications -> Settings -> Mythbuntu Control Center
Go to Plugins and unselect all the plugins except MythVideo and MythGallery (unless you want to use other features – I personally didn’t like the MythMusic plugin as it crashed a lot and I don’t use live TV, so MythArchive and MythMovies were no use to me)
Next step would be to configure the folders for Myth TV Video and Gallery plugins, its very simple and has a full graphical interface. You can get more details at:
http://www.mythtv.org/wiki/MythVideo
http://www.mythtv.org/wiki/MythGallery
The music player can be configured by running the following in terminal:
nyxmms2 server config output.plugin alsa
nyxmms2 server config playlist.repeat_all 1
nyxmms2 server config effect.order.0 normalize
To allow your Bluetooth mobile to shutdown and reboot the system, you need to perform the following on terminal:
sudo visudo
Add the following line to the end of the file and save:
%admin ALL = NOPASSWD: /sbin/shutdown, /sbin/reboot
Install and Configure anyremote
Anyremote (http://anyremote.sourceforge.net/) allows the linux box to accept commands from a Bluetooth-and-JAVA-enabled phone. This was the most complex piece to configure, only because it has so many functions – also since I didn’t know any shell-scripting when I started the project – I had to learn everything from scratch.
It was easy to install:
sudo aptitude install anyremote
The difficult part was getting the configuration file ready to do all I wanted it to do and basically ensure that I did not have to attach a keyboard to my frame EVER (the file is still under development and I’ll keep updating this post as and when I make changed).
It currently has the following functions:
- Control the media center application (MythTV)
- Control the music player (xmms2)
- Start slideshow
- Change screen modes – laptop only, projector only and mirror
- Control the 3G-Wi-Fi router
- Shutdown screens, suspend laptop, reboot laptop, shutdown, etc
Here’s the configuration file:
Download Mythtv.cfg
Run slideshow and anyremote on startup
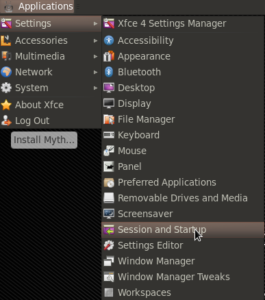
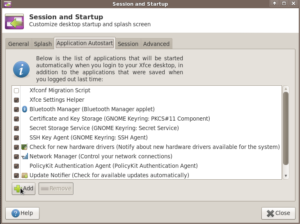
You can add the following commands in Applications->Settings->Sessions and Startup
- Anyremote:
anyremote -f ~/Documents/MythTV.cfg
- Slideshow:
~/Documents/Slideshow.sh
This assumes that the Slideshow and MythTV.cfg files are in your Documents folder.
Additional Script Files
Slideshow
#! /bin/sh
xrandr --output VGA-0 --off --output LVDS --mode 1440x900 --pos 0x0 --rotate normal --output S-video --off
xset -dpms
xset s noblank
xset s off

sleep 1
mythfrontend&
sleep 5
echo "jump mythgallery" |nc -q 0 localhost 6546
sleep 1
echo "key r" |nc -q 0 localhost 6546
osd_clock -c white -b -r -F "%l:%M %p" -f "-*-comic sans ms-medium-*-normal-*-*-*-*-*-*-*-*"
I’ve probably missed quite a few references – so thanks to google and ubuntu forums for all the help I garnered from them.
The Hardware
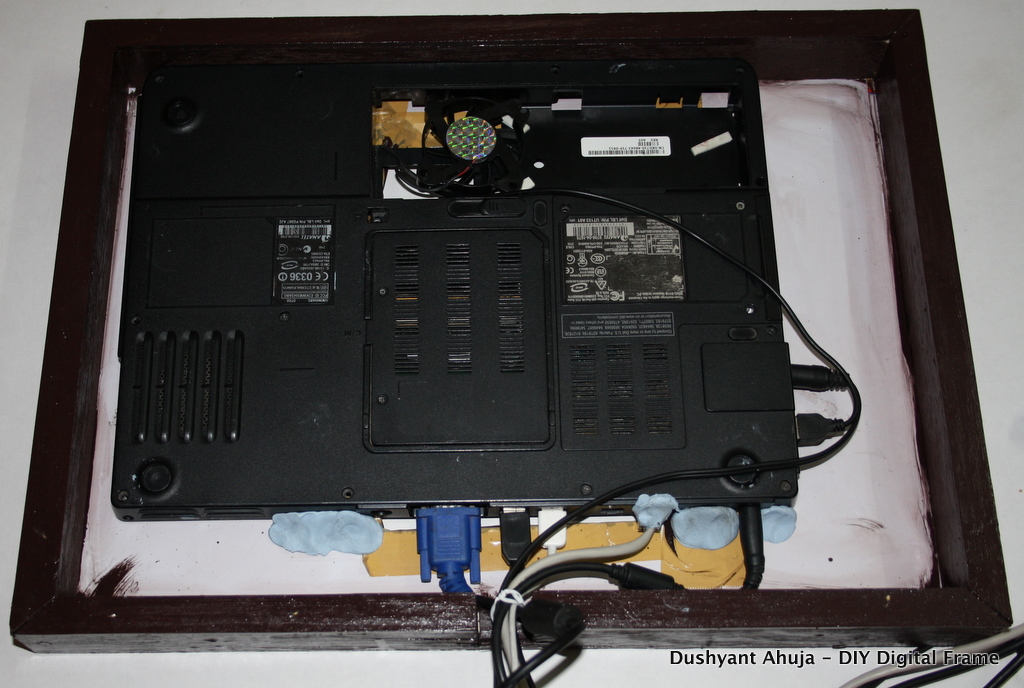
Once you have setup the software, you can start to disassemble your laptop and “frame” it. This step depends on your laptop model and manufacturer, and you can find many directions on the net (again google is your best friend). I would suggest, you try to find the guide for your laptop before jumping in as there are many hidden screws and you’re liable to break something (I know I did, missed one screw on the front side of the laptop and forced open the casing – luckily only the casing broke)
The first step was to buy a frame. Bought a ready-made frame:
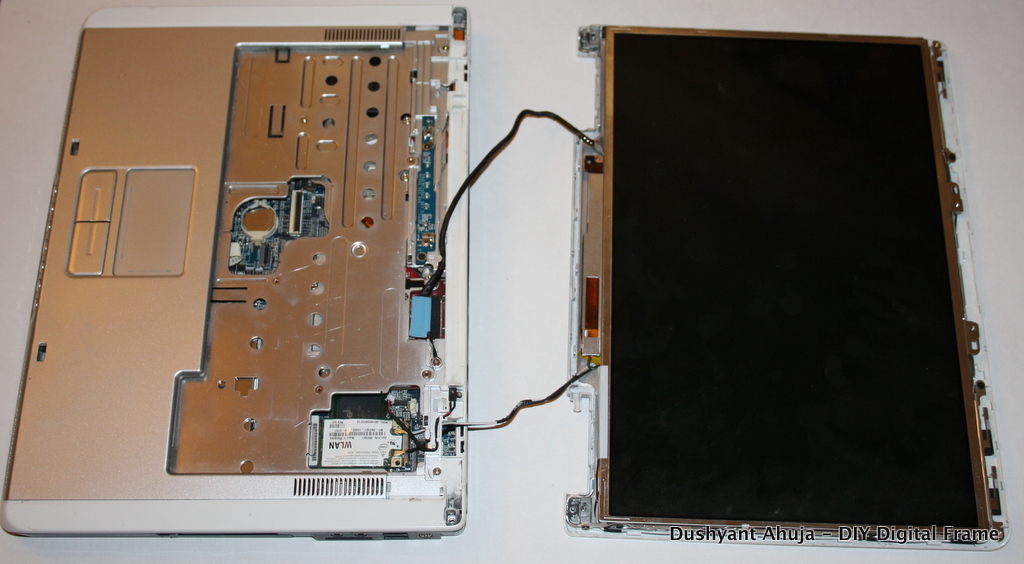
Asked a carpenter to build a box to fit behind the frame. Next was to open the laptop and detach the screen so that it can be pasted on the back.
To make space, I also removed the battery, DVD Drive, keyboard, trackpad, etc etc
I had to add two USB-powered fans as my CPU was getting very hot – later found out that was because of a 1″ thick layer of dust in the heatsink fan. Be sure to check that.
 The next step was to insert the CPU in to the box, I had asked the carpenter to make two large cutouts at the back – this allowed for additional ventilation as well as access to the power switch.
The last part was mounting the LCD on the frame – this is the most delicate step and must be done extremely carefully. I tried to stick it using FeviBond, araldite, quickfix, et al. However was finally successful with strong 2-sided tape. Was able to buy a roll from a car accessories shop. Do NOT use the one which you get in stationery shops – that does not work and the LCD may slip after some time.
Finally, you can screw-in the front of the frame to the box and switch on . . . ta daa
Phew . . .
Update:
Finally got a broadband connection at my home – so the frame is now connected at all times. What better use than to make it into a torrent downloading machine. So now, I’m able to search for torrents in office, drop them in my dropbox folder and by the time I reach home its downloaded
Used the tutorial on this page (uses transmission and dropbox):
http://blog.gesteves.com/post/84438959/start-bittorrent-downloads-remotely-with-dropbox






If you need a light OS for your digital picture frame you can use this one based on openSUSE11.3: http://susegallery.com/a/OFJVZe/photoframe
Dude, I use such computer all the time (even right now), and here you make a digiframe of it! Hey it’s not that old:) I’m a bit offended 🙂
I mean – it is old, alright, but are new computers any faster or better? Current newest beauties have 2.4ghz per core, and i6400 has 1.6ghz per core at least, 2gb RAM, and so on. For nowadays software, it’s still a very good computer.
You should be using a 486 for digital frames, man! That would be hardcore. This is a waste:) !
Still, a nice article of course.
Regards from Poland!
I agree with you – the machine is very powerful – unfortunately there were some problems with it:
1. One of the ram slots is burnt, and the other doesn’t support more than 1 gb (god only knows why)
2. The system was running very slow – only later I realised that this was due to the CPU reducing its speed to 800 MHz. The CPU fan had so much dust collected that when I opened the system, at first I thought it was some kind of a pad. Basically the system was overheating like crazy.
Also, I realised that this is still a powerful machine, and hence I’m also using it for the following:
1. Media center – runs videos on a connected projector
2. Time machine server for my macbook pro
3. Dpf
4. Music system
Of course all controlled through a mobile – so don’t need a keyboard or mouse attached.
Anyways – thanks for your comments
this is really awesome.
surfing the net at the moment with my Inspiron 6400 and trying to learn more about Linux and stumbled on your site.
Good job.